|
Contour Cutting allows you to print an image and then use a cutter to cut portions of that image. Your image file uses a specially prepared spot color that acts as a cut path. When the job is printed using RIP-Queue , the spot color cut path is not printed, but the data is recorded. This data is then used by your cutter to determine where the image needs to be cut.
 Using Contour Cutting Using Contour Cutting
Contour Cutting uses a three-step process:
- Create a cut path in a vector-based drawing program. Some popular programs include Adobe® Illustrator® or CorelDRAW®.
- Create a special Quick Set that uses the cutter path prefix. This creates the cut file from the cut paths in the image (Figure 1).
- Determine your cutting workflow and change your printer's setup options accordingly.
Creating a cut path
The first step in Contour Cutting is to create a cut path using a vector-based drawing program. This path can be as simple or complex as you like. Once the path is created, assign a spot color to it. The name of this spot color is critical to using Contour Cutting because RIP-Queue identifies the cut path from that name. The spot color name should have a prefix associated with it that will be recognized by RIP-Queue. If this prefix is not used, RIP-Queue will not create the cut path.
To create a cut path and assign a spot color using Adobe Illustrator:
- Open the image file in Illustrator.
- Create a new layer (Window > Layer > New Layer), and select that layer.
- Draw your cut path using the box/ellipse, pen, or pencil tool. Make sure to close all cut paths.
- Open the Swatches Palette. If the Swatches Palette is not readily visible, you may need to open it by selecting Swatches from the Windows menu.
- Click the arrow in the upper right corner of the Palette, and select [New Swatch\. This opens the New Swatch dialog.
- Enter CutContour as the name of the new swatch. This needs to be spelled exactly as shown here.
- Select Spot Color from the Color Type drop-down menu, and use the slider bars to create a color. The color is not important since it will not be printed.
- Click OK to close the dialogs.
- Select your cut paths and assign your new swatch color to those paths.
- Save your file in .eps or .pdf format.
When RIP-Queue prints the image, the spot color you selected will not be printed. Instead, RIP-Queue will convert that color into the cut path to be used by your cutter.
NOTE: You may use any vector-based drawing program you want. These instructions are specific to Adobe Illustrator. Most drawing programs will follow a similar process. If you have trouble, see the Help Files in your drawing program.
NOTE: If the cutter you are using supports multiple layer cutting, you may use different cut path names to indicate the different cut layers. Each cut path name must start with the same prefix (such as CutContour) and then be followed by a number from 1 to 9. (e. g. CutContour1, CutContour2, etc.) These different layers can then be assigned separate cutter settings in ONYX CUT-Server . For more information, see CUT-Server Online Help.
Creating a Quick Set for Contour Cutting
Before you can print a contour cut file, you must create a Quick Set . You can either create a new Quick Set or modify an existing Quick Set. The Contour Cutting Quick Set determines the spot color prefix used in step 6 of Creating a Cut Path (above) as well as the ability to use additional options such as [Tile Outline Cut Paths] and [Trim Overlap] (Figure 3).
To create a Quick Set for Contour Cutting:
- Open the Edit Quick Set dialog (Figure 1) by either clicking Configure Printer > New or Edit Quick Sets > Edit. .Click the first button to create a new Quick Set; the second button to edit an existing Quick Set.
- Select your cutter from the Contour Cutting drop-down menu. If your cutter is not available, select Generic Cutter(Figure 1). Set all the other Quick Set options you want, and click Advanced button. This opens the Advanced Options dialog.
- In the “Advanced Options” dialog, select the [PS/PDF Options] from the PS/PDF tree and enable the [Use Cutter Path Prefix] option (Figure 2). The prefix must exactly match the prefix you entered in step 6 of Creating a Cut Path. If it does not, you will not be able to create the cut path. In this case, leaving this as the default setting (CutContour) is strongly advised.
- Select the [Marks from the Finishing tree, and select additional options. You can choose to [Generate Tile Outline Cut Paths] or use ]Trim Overlap] (Figure 3).
- Click [OK].
Generate Tile Outline Cut Paths - This option is useful for multiple copies of an image that does not contain an embedded cut line or for cutting around the edge of a tiled image.
Trim Overlap - This option configures RIP-Queue to place cut lines where overlap is added to image tiles.
Determining your Contour Cutting Workflow
Depending on your equipment, you can use one of three workflows:
- Print and cut on the same device - This workflow uses RIP-Queue to print and cut your image.
- Print on any printer and use the I-Cut® - This workflow uses RIP-Queue to print your image and the I-Cut application to cut it.
- Print on any printer and use a separate cutter - This workflow uses RIP-Queue to print your image and CUT-Server to cut it.
To print and cut on the same device:
- Open the Edit Quick Set dialog (Figure 1) by either clicking Configure Printer > New or Edit Quick Sets > Edit. Click the first button to create a new Quick Set; the second button to edit an existing Quick Set.
- In the Contour Cutting drop-down menu, select [By Printer] (Figure 1).
- Click [OK].
- Open your file and apply your Contour Cutting Quick Set. RIP-Queue will print the nested images and automatically cut it.
NOTE: This workflow requires that your printer can act as both printer and cutter.
To print on any printer and use the I-Cut®:
- Follow steps 1 through 4 for the previous workflow, but select [I-Cut ]instead of [By Printer] in step 2 (Figure 1).
- Once RIP-Queue is done printing, place the finished print on the cutting table.
- In the I-Cut application, select Options > File Location.
- Browse your network and select the [Thrive12Cutter (machine name\cutter\I-Cut)] folder.
- Start the cutting process. The cutter automatically reads the barcode on the image and finds the corresponding cut script file.
NOTE: This workflow requires that you have an I-Cut digital die cutter. When you print using this workflow, a barcode is automatically printed on your image. This barcode tells the I-Cut cutter where to cut your image.
To print on any printer and cut on a separate cutter:
- In RIP-Queue, highlight your printer, and click button of the [Placement]. This opens “Placement Strategy” dialog (Figure 4).
-
In the “Placement Strategy” dialog, select the [General] tab, and set the Top Offset to 2 inches, the Bottom Offset to 2 inches. This adds an extra margin that the cutter needs when moving the media back and forth.
- Click OK.
- Open the Edit Quick Set dialog by either clicking Configure Printer > New or Edit Quick Sets > Edit.Click the first button to create a new Quick Set; the second button to edit an existing Quick Set. Select your cutter from the Contour Cutting drop-down menu. If your cutter is not available, select [Generic Cutter].
- Click OK.
- Open your file and apply your Contour Cutting Quick Set.
- Once RIP-Queue is done printing, use CUT-Server to cut the print.
Modifying the Cutter Setting
You can change the cutter assigned to a print job by right-clicking on the job and selecting Job Properties. On the Job Settings dialog, you can then select a new cutter or, to turn off cutter marks, select None.
Job Nesting by Assigned Cutter
When Job Nesting is enabled, only jobs with the same cutter assignment will nest together. This assures that jobs intended for a particular cutter will print with the correct marks for that device.
|
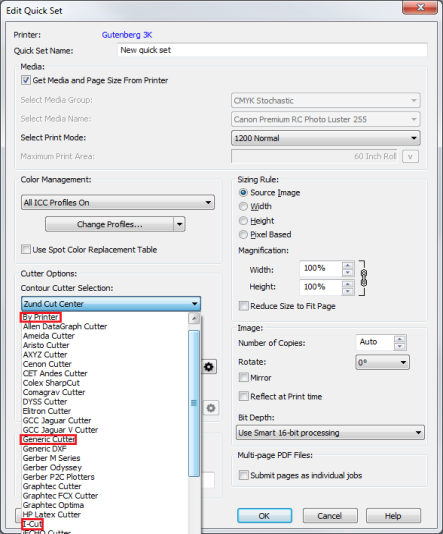
Figure 1
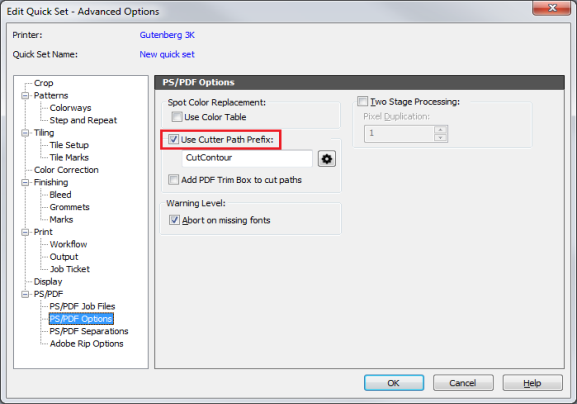
Figure 2

Figure 3

Figure 4
|
